Sunday, December 23, 2007

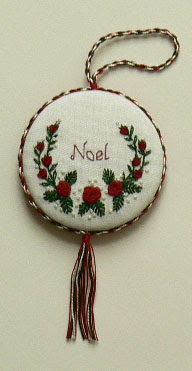
Rose Vine Ornament


This is a Wendie Young design that I have slightly changed to make a Christmas ornament out of it.
Pierrette =^..^=

Thursday, November 29, 2007

Roses and Noel Ornament


This is a Victoria Sampler Christmas ornament that I have just completed the stitching and finishing, which is now all ready to go on a Christmas tree.
-
I had been wanting to make it for quite some time but for some reason or other never got around to it. I am glad that I did this time around. It was lot of fun to stitch and a wonderful experience. I am always learning something new each time I work on a project, so learning curve going up (big smile).
-
Roses and buds are bullions, fly stitches for the big leaves, lazy daisies for the smaller leaves and stem stitch for the stems. I have used DMC threads for this project. Was tempted to use Edmar threads, but changed my mind. If I make another one, I will probably do it Brazilian embroidery style.
-
Pierrette =^..^=

Wednesday, November 21, 2007

Bookmark: Painted woman


These days I am deep in experimentation with different medium and wanted to make something special for Terry's adult son Matt, who has returned to the unversity to study art amongst other things.
-
The idea came to me to make him a bookmark where I would attempt to paint a woman and only outline her silhouette and clothing in stitches. I wanted to give the feeling of oil painting by using watercolour.
-
Here is the finished product, but he won't be able to see it before Christmas. I do hope he gets a kick out of it.
-
Time to move on to another project for Christmas as tomorrow is already Thanksgiving. Can't believe how time flies when I am having fun.
-
Pierrette =^..^=

Thursday, November 01, 2007

Fabric Envelope


I have made this embroidered envelope for my very good friend Terry so that she can carry some of her little treasures with her. I know that she has been carrying her Halloween ID card and an embroidered angel with her in her purse, so now she will have an embroidered container to put them in. Hope she likes it.
-
This is an adaptation of an Inspiration magazine design by Brenda Ryan (magazine #51)
-
Pierrette =^..^=

Saturday, October 27, 2007

Halloween Memories: Time for some fun

-
Halloween is around the corner and I thought it would be fun to bring back some of the projects I have made for past Halloweens.
-
This little friendly ghost washing the cobwebs is the only one that I have kept for myself and just love it. It is very hard not to smile when looking at it.
-

-
This needlepoint one with the witch flying while the two black cats are looking up at the moon was made especially for Terry last year. She had two black cats at the time.
-


-
This one has been made this year, again for Terry, as an ID card. She tells me that she has been having lots of fun showing it around. I have been asking her whether people see a resemblance with herself and the response I thought was the funniest was when someone told her that I must have been using a very bad photo to make it and all that time I thought I had done such an incredible job (big grin).
-


- This is a postcard I had made for an exchange a couple of years back. This is a Dracula Spider, if such things exists (grinning again).
-
Hope everyone has lots of fun on Halloween day.
-
Pierrette =^..^=

Thursday, October 18, 2007

Seeds of Love: A Brenda Ryan design


Here is the little coin purse all finished. I must say that this was really a lot of fun to make.

Not that long ago, seems to me, I was mostly doing needlepoint while my good friend Terry was mostly doing embroidery. She wanted to do needlepoint and I helped her with some of her projects and I wanted to learn embroidery as I loved so much what she was stitching. The end result is that Terry is now also doing needlepoint and loving it and I am doing embroidery and absolutely loving every single minute of it and now can't understand why I had not started doing it earlier.

I have included a photo with the coin purse opened showing the embroidery.

There is such a sweet detail that the designer, Brenda Ryan added that I did not want you to miss it and turned the photo 180° degrees so that you can have a look at the little flower face looking at you when you are either putting something in or taking something out of the little coin purse.
-
-
Brenda suggested it as a little coin purse, but there are lots of other uses for it. The size of the little coin purse is a little over 4½" by 4½".
-
There are two other designs from Brenda that I will also be making. One is the same size but with a different embroidery and the third one is a bigger size with another embroidery. Different fabrics will also be used to make them.
-
Pierrette =^..^=


Wednesday, October 17, 2007

Seeds of Love: A Brenda Ryan design


One of the projects I am currently working on is "Seeds of Love", a Brenda Ryan design that can be found in the Australian magazine called 'Inspirations", issue 51, starting on page 66.
-
The project consists of 3 different fabric coin purses or anything else that you may want to put inside. This is one of the design. I think it is just darling. Those could also make lovely gifts using different kinds of fabrics and also creating your own design for the front part of it.
-
Now that the embroidery has been completed, I need to construct the little coin purse, which will probably be the next photo I add to my blog.
-
By the way if you want to have a look to some of the cover page of the Inspirations magazines, you may go to http://www.countrybumpkin.com.au/ . I have my subscription with them. They also have kits, wonderful books and so much more. I am a big fan of them. It seems to me that everything they do is just wonderful.
-
Pierrette =^..^=

Friday, October 12, 2007

Options ... in hardanger: Dale Sokolow, designer

I have decided to completely finish this hardanger this morning before starting anything else so have taken my best little scissors (German brand) and started the task of cutting very carefully all around the border twice, the first time as close as possible but not too much and then a second time, being very careful as I was getting very close to the border.
-
This is not a very big piece, only approx. 7.5 large by a little over 5 inches high, but is so cute. Just love it.
-
Now, on to my next project.
-
Pierrette =^..^=

Wednesday, October 10, 2007

Halloween ID Card for my friend Terry


Click on photo to have a better look.
-
With Halloween around the corner, I wanted to make something special for my friend Terry and what could be more personal than her own Halloween ID Card.
-

This has been an ongoing joke between the two of us, with her jumping on her broomstick to come visit in order to save on petrol (she lives in the UK) and I live in the USA.
-

I was concerned that with all the Halloween sky traffic, some overzealous policeman might stop her and ask her for some identification. She can't very well show him her driver's permit since she would be flying, so now she is ready for all eventualities :-)
-

The photo was scanned as the digital camera was not giving good pictures, but I am afraid that her hair was a bit squeezed in the process. Oh well, we can't win them all :-(
-

It was actually a long process to make that little ID card as first I had to decide on some drawings for the witch, then I had to find photos for the ID itself, put the two together, then added a bit of color with Prismacolor crayons, then scanned it and printed it on fabric. After that started stitching, then added a bit more color this time with some watercolor crayons and a little bit of water, then found some purple fabric for the back, put a little padding in between and stitched the back with the front.
-

Of course, I had to write Terry's name with profession and I just had to stitch a little spider. No Halloween respectable photo would find itself without either spiderwebs or spiders, so added that last detail. She is not a real witch as she has that plastic nose that is being held with an elastic. Gave her some reddish hair as those are Terry's natural hair color. I did not want to make her clothing too chic as she is a witch after all and they are not supposed to be well dressed.
-

Well I had my fun now and hope that Terry has fun with it too. Now I will be moving to something more serious and start working on a beginner's metal thread project. That will be something new to learn for me and looking forward to it. Next one after that will probably be a beginner's stumpwork project.
-

I will also probably work on some special gifts in between so I will have my hands full like always.
-

Pierrette =^..^=

Sunday, October 07, 2007

Options ... in hardanger: Dale Sokolow, designer


Options ... in hardanger is an EGA GCC (Group correspondence class) and has been designed by Dale Sokolow.

-


This is my second hardanger course, the first one having been "Beginner's hardanger" with Marion Scoular. It really helped a lot for me to have taken Marion's beginner's course first as it gave me a good basic knowledge of hardanger before tackling something like this.

-


I was also exposed to two different ways of doing hardanger. With Marion, the project was done without any hoop or frame and with Dale it was suggested that we used a frame.

-


My preference seems to go with using a frame as I was much better able to control the regularity of my stitches. I had to remove the frame and do 2 fillings because they both had picots in them and those can't be done using the frame and I had problems with regularity of my stitches. That could have been made worst as I had done the whole piece with the frame and bang had to switch just like that and do the last two fillings holding the fabric in my hand.


I must say that I have learned a lot with these two projects.

-


I still have to cut the fabric around the border before it is considered all completed.

-


Pierrette =^..^=

Monday, September 24, 2007

Virtual Book Tour: Janet M. Perry Guest Blogging: An Article about Painted Canvas


Throughout the month of September, Janet M. Perry has been visiting needlework-related blogs and shops, which is part of her special celebration for her new book called "Needlepoint Trade Secrets" and I am so happy to have Janet as a special guest on my blog today that I have rushed to make you all a little "virtual" cup so that you can have a nice cup of tea or coffee while you are making yourselves confortable to read the wonderful and instructive article that was written for this occasion.

Janet asked me what I would be interested in for her article on my blog. I thought for a brief moment and said "Painted Canvas" (as this is a weak point of mine), the mysteries of painted canvas for the stitchers, meaning how to tackle them - what stitches to use - what threads to use - are there any books that tell us, for example, if you want to stitch snow, you could use this stitch or that one and either this thread or that one and that would give you the effect you are looking for. I quickly got an answer back from Janet saying that she would be happy to write a short article for us about that topic.

Janet, before I leave the floor to you, I would like to thank you very much for thinking about doing this Virtual Book Tour. It has been fun to go along with you on each visit.

Pierrette =^..^=

Here is the article written by Janet M. Perry about Painted Canvas:

===============================

PAINTED CANVAS

Janet says:

Stitching a painted canvas looks so easy. The colors are picked out for you and all you need to do is add threads and stitches -- so why is it that so often we are not happy with the results?

Since I discovered painted canvas (in the early 80's) I've stitched hundreds of them, I even dream about canvases, threads, and stitches. As a result I've figured out some guidelines for stitching them which make it easier to do.

First I think about threads. Your canvas gives you color, but not texture. And for any given color a number of threads exist in different textures. For me, I try to pick a thread with a texture similar to what the object is in real life. For example snow, should be a white or clear sparkly thread. My favorite for this (and for stars as well) is Nordic Gold from Rainbow Gallery. I like this lightness of the thread, it's softness and it's sparkle. For hair, I like Rainbow Tweed because it has some variation in it and has just enough furiness to look realistic.


"Snuggles" (photo provided by Janet to illustrate snow)
-
The texture of the thread determines how easily it will be noticed on the finished canvas. Furry or fuzzy threads are always seen first. Metallics are just slightly less noticeable than furry threads. The more matte a thread is, the less obvious it is. So the same color thread in pearl cotton, floss and Silk & Ivory will be most noticeable in pearl cotton and least in Silk & Ivory.
-
Once you have picked out your threads, double check that you haven't picked out an attention-grabbing thread for an area which should be in the background.
-
But I've learned by trial and error, I don't know of any books which really spell this out.
-
Then I look at the canvas. Every canvas should have some areas of Tent Stitch in it. Sometimes the choice is made for you, for example faces almost always look best in Tent Stitch. Tent Stitch gives the eye a place to rest and is the neutral texture in needlepoint. It's kind of like zero on a number line.


"Jack Russell" (photo provided by Janet to illustrate Tent Stitch)
-
Once I know where Tent Stitch will be placed, I can then rank other spaces as being higher or lower than those areas. Lower spaces should have flatter or more open stitches. For these I use stitches like T Stitch, or techniques like Blackwork or Pattern Darning. For example, I almost always use Pattern Darning for skies, because the flatter stitch makes the sky look more open and bigger.
-
The places which will be higher will use stitches with more texture. This is the hardest part of picking stitches for needlepoint. The stitches you pick should be small enough to have three repeats of the stitch in every direction. This is enough for the eye to distinguish the pattern. Fewer repeats and the stitch can be mistaken for other stitches or the design can look confused. Even experienced stitchers get this wrong.


"Sakura" (provided by Janet to illustrate small stitches)
-
There are two major exceptions to this rule. One is stripes. By their very nature stripes won't have three repeats in all directions in an individual stripe, but the whole stripe pattern should be repeated, if it isn't, pick a different stripe pattern. The second is accent stitches. There are lots of these, such as Eyelets, Rhodes or Jessicas. Accent stitches, most of which can be expended easily, should be sized so a single stitch fits in an area. Most of these stitches draw attention to themselves and having partial stitches in these looks jarring. Change the size or the stitch rather than use partial stitches for accents.
-
I think another big challenge in needlepoint is adding texture to very small spaces. One easy way to do this is by picking threads with different textures, but often this does not go far enough. Then you should have a repertoire of stitches which only take up one or two threads. Some of the stitches I use again and again are Tiny Knitting (columns or rows of Continental and Reverse Continental) Needlepoint Cross Stitch (cross stitch over one intersection), and open versions of Tent Stitch. Building from that you can add high textures with French Knots or beads. Suddenly you have taken something which could look flat and given it dimension, life and subtle texture.
-
For finding stitches for particular effects, I mostly rely on my own experience. I look for stitches which have a particular shape. I use stitch dictionaries for ideas. And I'm always willing to pull out an area off if it does not work. On a piece I'm working on now, I'm stitching a blackboard. I've ripped it out twice. The first time it was because I thought the thread (#12 pearl cotton) was too small. The second time, using #8 pearl cotton, I felt the stitch, Skip Tent, was too directional. I'm now stitching it in T Stitch and like the result.
-
But these are guidelines. There can be great needlepoint which breaks the rules. But you should know what rules you are breaking and have a good reason to do so. If you start with this process, then when you divert from it, you will know why and where you are going.
--
Keep Stitching,
Janet M. Perry

Friday, September 21, 2007

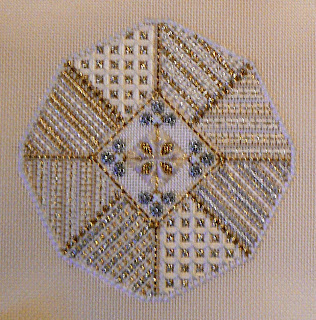
Arcadia: Dodecagon Ornament Series designed by Jim Wurth


I am very happy this morning as I have just finished stitching the 7th ornament of the Dodecagon series designed by Jim Wurth.

We will be receiving 12 ornaments total and have received 7 kits so far, so that means that for me I have finally caught up with the series. I should receive the 8th one in November, if I remember correctly.

I am now thinking of doing Halloween stuff in between regular projects. I think it is just so much fun to do. I am experimenting on something, a little gift for a dear friend of mine. Will see how it turns out, nothing big, but she will have the biggest laugh out of it, if it turns out as I would like it to. Will see.

Better go back to it as time really fly and I have so many projects to attend to.

I will be having a special guest on my blog this coming Monday September 24th. Janet Perry is making her Virtual Book Tour and will be stopping by for a visit. How nice is that?

Pierrette =^..^=

Friday, September 07, 2007

The Baroness Edie: A Jim Wurth Dodecagon Series Ornament


I ended up scanning this ornament rather than taking a digital photo as the outcome was truer to real life than what I got with the digital camera.
This was so much fun to stitch like all Jim Wurth's ornaments that I have done so far. That was the sixth one completed out of seven received so far.
I have just started working on the 7th one which is called "Arcadia", a companion piece of "Monrovia" stitched a little while back.
After that, 5 more to receive to make a total of 12 Dodecagon ornaments.
Pierrette =^..^=

The Princess and the Pea: Framed


This is my "Princess and the Pea" all framed for me to hang on my wall ........... now, which one will it be?

If you want to see the close up, just click on the photo.

Pierrette =^..^=

Thursday, August 30, 2007

Hearts & Flowers: Dodecagon Ornament Series by Jim Wurth


I had the best of time stitching this ornament called Hearts & Flowers designed by Jim Wurth. It is the 5th one of his Dodecagon Ornament Series. I just could not put it down and finished it last evening, but by then it was too dark to be able to take a proper photo so had to wait until this morning.

I love his designs so much as they are complexed and stitches are multi-layered bulding up to very nice designs, which also makes them absolutely exquisite; Also the extensive use of metallic threads makes the ornaments sparkles as you work on them. They are quite addictive , so much so that I have immediately started working on another one called "The Baroness Edie, which has a dark green canvas and comes with mauve, yellow and green threads, very relaxing colors to work with.

I have received 7 ornament kits so far and have completed 5 of them, working on number 6 and will try to get to number 7 after so that I can finally catch up with this series and then all I will have to do is stitch each additional ones as they arrive.

Better go back to the Baroness now :-D

Pierrette =^..^=

Thursday, August 23, 2007

The Princess and the Pea: Completed


Here is a photo of my completed project.
Marion tells the stitcher at the end of her book the story that goes with the Princess and the Pea. I will be quoting Marion word for word in the following little story as I don't want to miss one single little detail.
Here it goes.
"The Princess and the Pea"
"Once upon a time there was a Prince who longed to marry a real princess. He searched all over the world to find her. There seemed to be plenty of Princesses but for one reason or another, the Prince could never be sure that they were, in truth, what he sought. Disconsolate, he returned to his castle. Slowly he grew paler and thinner, pining for a real Princess.
One evening there was a terrible storm. The wind blew, lightning slashed the sky, thunder crashed and rain lashed the countryside. Suddenly a knock was heard at the castle gate. The guards hurried to the gate, holding their lanterns high above their heads.
There at the gate stood a Princess. Rain had soaked her hair and streamed in rivers from her gown to her toes. But she was a Princess ... a real Princess ... she told the guards, and had become lost in the storm.
"A real Princess?" asked the Prince, in disbelief. "We must make sure," said his mother the Queen. She prepared a bed for the Princess, made with ten mattresses filled with the solftest eiderdown. Beneath the first mattress on the boards of the bed, the Queen placed one small dried pea. The Princess, unaware of this, climbed up to sleep on top of the feather mattresses. In the morning, everyone in the court gathered to hear the Queen ask her how she slept.
"I barely slept a wink," moaned the Princess. "I am bruised all over. My bones ache as if they were broken. There must have been some frightful object in my bed."
"She is indeed a real Princess," proclaimed the Queen. "No one but a real Princess could have such tender skin!"
The delight of the Prince knew no bounds. The Kind and Queen were well pleased. The Prince married her the very next day because now he knew she was a real Princess.
And the pea can be seen on a pedestal in the Royal museum to this very day."
Isn't it a sweet story?
Pierrette =^..^=

The Princess and the Pea: Top section


Well, I sure am happy right now as I have just finished stitching Princess and the Pea. This is the top section. Will soon post a photo of the entire completed project.

Pierrette =^..^=

Monday, August 20, 2007

The princess and the Pea: 10th mattress completed


All the mattresses for our Princess are finally stitched. This will be quite a climb for her to get to the top one. Better her than me :-(

Moving on to the top part now, which is a bit different but as interesting.

Pierrette =^..^=

Sunday, August 19, 2007

The Princess and the Pea: 9th mattress stitched


Well, here I am with mattress number 9 completed. One more to go, then it will be the top of the canopy which will be in hardanger (all white), so that should be fun also.
Still thinking about stitching a little Halloween project after this project is completed. That would make a nice break between the other big project that I have started "Kaleidoscope", which requires my full attention.
I have also put my unfinished hardanger project near me so that I can also finish that. It is an EGA GCC called "Options in Hardanger" Will bring back the photo a bit later when I am close to working on it.
Better go back to my last mattress now :-)
Pierrette =^..^=

Thursday, August 16, 2007

The Princess and the Pea: 8th mattress stitched


Well, another mattress completed, meaning 2 more to go before this part of the design has been completed except the little pea under mattress one, which according to Marion's instructions is stitched at the very end.

You will see two white lines (thread) over the top three mattresses. Those are there to help me with the shading of those three mattresses. Each section from left to right goes from lighter to darker.

It has been pretty hot around here lately and no rain. Yesterday it went up to 108°F making it very difficult to spend any time outside. I feel like a prisoner of my own house. Trees and shrubs are suffering from the lack of rain and heat. I am quite concerned that by the end of the summer we will have lost quite a few as we have had a double whammy this year, a very hard freeze in Spring followed by a very severe drought and nobody knows when this will all end.

All I can do is keep stitching. At least I have that :-)

Pierrette =^..^=

Wednesday, August 15, 2007

Kaleidoscope: Central section


This is the central section of Kaleidoscope. This is a very slow project, at least for me, as it requires lots of counting, so no distractions permitted, and also the use of your laying tool as each thread needs to be carefully positioned.
It is a beautiful design. I remember about 15 years or so, having seen it at my local needlepoint shop and finding it quite pretty, but I was only starting at the time and felt that this was not the project for me and I was right. I needed easier and less involved projects at the time.
Another thing about this project is the fact that it is very repetitive. You have to do the same pattern over and over again as you can see looking at the photo. I generally prefer to stitch different things as I go along, so this one will require much more discipline from me. I am a person who hates routine, so ...........................
Anyway, I do not regret my decision to have purchased it. I will just have to do it while also working on several other pieces so that it breaks the monotony a bit of repeating the same pattern over and over.
It may be a little while before I am in a position to post another photo as I want to finish my "Princess and the Pea" and have it framed as soon as I possibly can.
I also have a hardanger project that I have started quite some time ago, which I need to put the few necessary hours to finish and of course, let's not forget that Halloween project, not yet decided, that I would like to start :-)
Pierrette =^..^=

The Princess and the Pea: 7th mattress stitched


Another photo this morning, this time mattress #7 all stitched. So far the two mattress designs that I have enjoyed the most are mattress #4 (blue one) and mattress #7 (Fuschia one).

I realize that the photos that I have been adding are not always exactly the same. It is due to the fact that my husband takes them either inside or outside the house and also whether he takes the photos in the sun or shade. For the finish photo, I will ask him to take some photos under many different conditions and will select the final photograph according to how representative it is to the actual project and will post that one.

Since a couple of days, I have been thinking about Halloween projects. It is not as if my hands are not full at this time, but I have always had tremendous pleasure stitching something about Halloween. I need to find myself something absolutely adorable and at the same time, not a big project as I just don't have the time for it right now. Will see what I can come up with that would be a delight to stitch.

Pierrette =^..^=

Tuesday, August 14, 2007

The Princess and the Pea: 6th mattress done


Well, here we are with one more mattress completed and four more to go.

I was thinking the other day that one thing that I love so much about stitching with a blank canvas is see it evolved from "nothing" to something beautiful. I love to do the same thing with cooking. Both my husband and I love to cook from "scratch" as we call it. It takes more time but the rewards are wonderful. I am lucky as my husband does most of the cooking as he loves to cook, so it gives me more time for my stitching, but when need be, I can do my fair share also.

Going back to stitching some more on "Princess" :-)

Pierrette =^..^=

Monday, August 13, 2007

The Princess and the Pea: 5th mattress


This is a photo with the 5th mattress completed, so five more to go :-)

Pierrette =^..^=

Thursday, August 09, 2007

Kaleidoscope: Second photo - Sections A, B, C & D


A little more has been done on Kaleidoscope. Sections A, B, C & D completed on this photo.
I love the colors that will be part of this project. Something else that I enjoy is using my laying tool. To me it means "slow pace" and I just get in that relaxed mood, knowing that it is going to be a long slow trip to somewhere wonderful (another little adventure) Big grin here
Pierrette =^..^=

Wednesday, August 08, 2007

Kaleidoscope: First photo - Sections A & B


Kaleidoscope is an adaptation of a Sue Lentz design, then adapted by Anthony Minieri for Needle Necessities. This design is, in essence, a four-way geometric that becomes and eight-way geometric.
In this design, I will be using Congress Cloth and Needle Necessities Floss Overdyed threads. There are two options in stitching this pattern. I can either control the variegation of the overdyed floss or stitch randomly. I have decided on the second option as to me it will make the piece more interesting.
This is a photo of the very center of the piece (sections A and B).
This is a complex design so I will be stitching on it when I am not tired :-)
Pierrette =^..^=

Tuesday, August 07, 2007

The princess and the Pea: 4th mattress completed


I have now completed the 4th mattress. I have really enjoyed this pattern. I must say that I feel that I am having more fun with this project that I deserve <>. I am so happy that I decided to start stitching it now instead of later. It will give me some experience in Blackwork and will make it easier to tackle some other wonderful Blackwork project that I have been keeping for later.

This photo may look a bit different as it was taken outside in the shade instead of under big lighting inside my stitching room.

At first I thought that I might change some of the colors that Marion has chosen for herself, but I like her choice of color so much that I have been sticking to them so far.

Six more mattresses to go. Tomorrow, I will start on mattress #5. Another thing that I am finding out is that Blackwork, at least this project, goes rather quickly even for me as I see myself as a SLOW stitcher. I truly enjoy the journey, not just the destination, so I don't mind taking the time it needs for completion.

Pierrette =^..^=

Sunday, August 05, 2007

The Princess and the Pea: First 3 mattresses stitched


Just finished stitching the third mattress of the Princess and the Pea. Updated photo added.

Only 7 more to go :-)

Pierrette =^..^=

Saturday, August 04, 2007

The Princess and the Pea


Not long ago, I have decided to finally start working on "The Princess and the Pea", designed by Marion Scoular. You can see the whole design here:
I have purchased that design many many years ago and was waiting to get more experience before tackling it, but decided to go ahead even if I had not :-D
I must say like most of Marion's projects, they are so well explained that they are quite manageable even with not much experience. I have done a beginner's hardanger piece designed by her and I was able to understand how to do certain things that had left me confused everywhere else, so in my book, she is very good :-)
I have added a photo of the bed with the first two mattresses completed. There are 10 of them, so there is still a way to go before I get to the TOP of the bed.
I have always loved that design so much and was concerned not to be able to do it justice with my lack of experience in Blackwork, but I am quite pleased with how it has turned out so far.
I will keep adding photos as I progress with the mattresses until it is all completed.
Almost forgot to mention that the little circle that is not yet stitched under the first mattress is the little "pea" that will be stitched at the very end.
Will go work on mattress number 3 now ................ see you all later :-)
Pierrette =^..^=

Friday, August 03, 2007

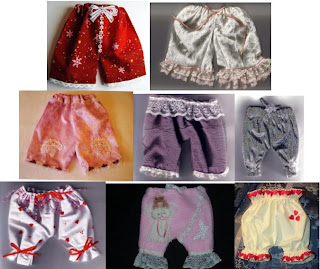
Little Miniature knickers for Terry as a joke


Well, I have just managed to find all those lovely little knickers that we had made for our British friend, Terry, as a big joke as I was saying in my last blog entry :-)

Those miniature knickers were made by the following members of our little group. From top to bottom and left to right: First row: Pierrette & Kerry; Second row: Elaine, Linda F. and Denise; Third row: Jackie Y., Jill and Catharine.

I think that we all got carried away a bit with how we saw "knickers" for Terry but we sure had a ball making them :-)

Terry was supposed to somehow frame them all together, so not sure if it has been done or not, but I am sure that she had lots of fun receiving them and perhaps has used a pair or two since then as I keep teasing her mercilessly :-D

Pierrette =^..^=

ATCs: Secret Knicker Gang - 2005


I was looking at some of my photos the other day and found this little series of ATCs that were made sometimes during the year of 2005.
It had all started with a joke concerning my good friend Terry. I am a big teaser and she often said to me that she almost peed in her knickers (being from dear old England), so the idea came from that. A little group of friends decided to make her little miniature knickers as a joke and we had the best of time making them and joking amongst ourselves.
Anyway, we kept talking about dropping the knickers at the post office and I guess you see me coming with this and this little series of ATCs were made for me from this little group of friends going all the way from dropping knickers to going to prison.
The names of those who made the ATCs from top left to right going down are: Elaine, Jackie Y., Linda F. Jill, Catharine, Denise and Kerry.
I will have to dig up the little knickers that we all made for Terry and post them on my blog next. I am sure they are in some of my files somewhere :-)
Pierrette =^..^=

Friday, July 27, 2007

Stitching Accessories


This photo shows all the stitching accessories that were part of a Cyberclass that I took with Carole Lake.

First row from top to bottom on your left are three views of a "needlecase". The center row from top to bottom are a "weight", next going down is a "name tag" followed by a "scissor fob". Finally on the row completely to your right, going again from top to bottom are two views of a "laying tool case" followed by a "scissor case"

I have done both the stitching and finishing of all those accessories.

Pierrette =^..^=

Pincushions


I thought that I might as well unite all the pincushions that I have either made or received under one big photo as well :-)

The first top row are pincushions that came from kits. There is a Victorian Triangle which I have made for my friend Terry, then the Victorian Heart that I have kept for myself and the third one of the first top row is called Victorian Antique Ivory which I have given to Rengin as a thank you.

In the middle row, the white one on the left with silk flowers I have also made for Anne as a thank you, the middle red one I have given to Terry and the little Assisi one I kept for myself.

On the bottom row, the white and blue biscornu was a gift from Terry as well as the doggy and also the pink one with the Brazilian embroidery.

It is fun to be able to see all of them together since many have found good homes and I can't see them anymore :-(

Pierrette =^..^=

Needlecases


This is the first needlecase I have made of the whole series and it was part of some stitching accessories, a cyberclass taken with Carole Lake. You can see the front view, the complete view seen when opened and the back view when needlecase is closed.


I thought it would be fun to put all my needlecases on the same blog entry. Some of those needlecases were made by myself, others by friends and exchanges and one I bought at a time when I had none.

The little horse looking over the fence is one that I made for my friend Terry and so is the one with the lady with the hat holding a bouquet of flowers. The horse's head is one that I made for Pauline for an exchange.


These are the only two needlecases that are as pretty on the back as on the front. The under the sea theme was made for me by Elsie during an exchange and the cottage garden is the latest I have made and it is for myself :-)


Here are the two that we have seen completely opened on the top of this photo, then the little white one is the first one I ever had and I had purchased it at the needlestore at the time. The bigger one in the middle is made crazy quilt style and was made during a group project and finally the pink one with the "P" initial was made by my friend Terry. She had made me a trio at the time (needlecase, pincushion and little scissor fob).


I have been busy this morning reorganizing my needles as my goal is to have a different needlecase for different needles. Example: the under the sea scene needlecase contains all my milliners/darners needles as the person who made it was doing a lot of brazilian embroidery stitching, so that makes it easier for me to remember what kind of needles are inside, plus of course I have written the names and sizes inside too :-)


Pierrette =^..^=


Saturday, July 21, 2007

A Cottage Garden


I am doing a happy dance this morning as I have just finished the stitching part of "A Cottage Garden".

This is a Kris Richards of South Australia design taken from the fantastic Australian magazine called Inspirations, issue 53.

I must say that I have learned a lot doing this project and it will greatly help me when I tackle other similar projects from them.

This Cottage Garden will be turned into a needlecase. I believe that I can never have too many. What I want to do is keep different sorts of needles in different needlecases, so when I want to find some straw/milliners or embroidery/crewel or tapestry, etc. I will get one of my needlecases and start stitching.

In this design, here is the list of stitches that have been used: blanket stitch pinwheel, bullion knot, bullion loop, couching, detached chain, fly stitch, French knots, granitos, rosette stitch, running stitch, satin stitch, stem stitch and straight stitch.

One book that I have that has been real helpful for helping me along with those stitches is the book called "The Embroidery Handbook: The Ultimate Guide to Thread Embroidery. This is again an Inspirations book published by Country Bumpkin Publications.

Now, I will need to get busy doing the finishing. Will have a look at my fabric and see what will go well with it. When it is all done, will add another photo.

Pierrette =^..^=

Wednesday, July 18, 2007

Bruges, Belgium "Doorways to the Past" Series: Painted canvas by Anne Stradal


I am quite happy today as I just got back my Bruges door all beautifully framed. I just love what "Romancing the Frame" have done for me :-)

If you want to have a better view of how the frame with my stitching really looks like, just click on the photo itself and it will make it much bigger for you to see details.

Pierrette =^..^=

Sunday, July 01, 2007

Bruges, Belgium "Doorways to the Past" Series: Painted canvas by Anne Stradal


I must start this entry by saying that my husband was born in Belgium, not far from Bruges and I wanted to stitch this door called "Bruges, Belgium" which is part of Anne Stradal's "Doorways to the Past" Series. If someone wants to pay a little visit to Anne's website, it is http://www.absdesignsonline.com/ .

Like all good new owner, the first thing I did is repaint and change the greenery as I wanted flowers. I love flowers even more when I don't have to care for them. I am saying that mostly because we are having a severe drought here where I live and everything in our garden seems to be quickly fading away, so this is fantasy time for me. I will never have to water and feed these flowers. Isn't marvelous? I don't have that magic green thumb either so that is not helping any :-(

I stitched the two little shrubs in silk ribbons (leaves and roses) and then I wanted some wisterias like I have in my garden. They are so pretty and smell so wonderful. Watch out for the bees though when the flowers are in season as they become very proprietory and will go in pursuit of anyone coming too close. Ask me why I know this?

At the front, there is a sidewalk and my husband wanted some cobblestones. He is European, remember? I started looking in those wonderful books called Stitches for Effects, More Stitches for Effects and Even More Stitches for Effects by Suzanne Howren and Beth Robertson and found what I was looking for. The stitch I chose can be seen on page 39 of volume 3 of the series. It is called "Continuous 2-4 Woven Scotch". It is not the kind of stitch that you can just breeze through it, but when you got the rhythm of it, it was rather fun to do. A good laying tool is a must with this stitch as I was using regular DMC cotton floss threads (two different colors).

I got another idea from their books. They suggested beads to use for door knob. It was a great idea and I was able to find in my stash a bugle bead just the right size and color, so that was quick to attach and before I knew it, I had completed the project.

Not sure how I will finish this now. Need to have a serious think about it :-)

Moving on to the next project. What will it be??????????????????

Thursday August 2/2007: Just heard from Anne telling me that she added my door to her guest galery:-) Here is link: http://www.absdesignsonline.com/guest_gallery.htm

Pierrette =^..^=

Friday, June 01, 2007

Halloween's Friendly Ghost : Flat-Fold Finishing


As I was saying in my last post, I have been keeping myself busy finishing some already stitched projects and I have just completed the Flat-Fold finishing on my little ghost (little Halloween project). I have done quite a few Halloween projects, but they have all been giving away, so this is the very first that I get to keep for myself :-)
Some time ago I had purchased a little finishing book called "The Flat-Fold" written by Judy Odell. This booklet is part of her "Just A Thought" series explaining different ways of finishing projects. For those of you who might be interested, her web site is http://www.justathought.net/prod/booksandbooklets.shtml
I must say that the way she explains things together with lots of photos made it quite easy for me to do my first flat-fold finishing.
I have added a little spider on my finished project. Looking at her, I have been wondering what she could possibly be thinking about our friendly or perhaps not so friendly ghost in her case. Those spider webs are quite fragile and watching our smiling ghost washing them and then hanging them to dry like that could be enough to give our little spider a heart attack or at the very least a nervous breakdown <>
I will now be moving on to a project that I have just started before I started working on all those finishing, which is called "A Cottage Garden". This is an "Inspirations" magazine project and it will become another needlecase. This one though will be for me since the last one was given to my good friend Terry.
Pierrette =^..^=

Monday, May 28, 2007

Assisi Style Rabbits finished as a pincushion


Lately I seem to be putting a lot of time to do "finishing" on already stitched projects. This little Assisi project which I have just finished as a little pincushion was a free project offered at this site: http://www.berlinembroidery.com/assisirabbits.htm
I was lucky enough to find some Silk Dupion the same exact shade of red that I have used to stitch this little project, so I was quite happy about this.
The little pincushion is actually resting on some leftover of that fabric.
I am starting to have a little collection of pincushion and I have a feeling that this is not the last one I will be making :-)
Pierrette =^..^=