Tuesday, April 29, 2008

Gracie: Framed


My Gracie has just came back from the framer and here is a picture of her. We made the decision not to put a glass over this time around, so I will be able to play with her whenever I feel like it (big smile).
-
I was happy to hear back from the framer, especially today as I am having one of those days where nothing seems to work just right. Bet you all know what I mean. Anyway, Gracie has put a bit of sunshine in my sorry day.
-
Been working on my Elizabethan crewel project this morning, the one that will go into a pencil box when finished. Going well so far. I checked the box I purchased with the kit and to my surprise there was no finishing instruction at all, no cardboard included or anything, nothing to attach it in position, so just wrote to Barbara from Tristan Brooks hoping that she can give me a bit of information as to how to go about putting everything together. I have purchased boxes before, not from Olde Colonial Designs though, but there were always finishing instructions with them, so will see what happens with this one. Still have a little bit of stitching to do before getting to that finishing part, so I am hoping to hear back from Barbara soon as I love to finish my projects as soon as they have been stitched.
-
Now, back to my stitching :-)
-
Pierrette =^..^=

Monday, April 28, 2008

More Options .... in Hardanger: Motifs completed


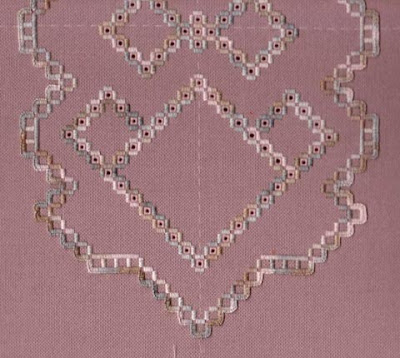
Again, I have scanned instead of taking a photo as it comes out a bit better. The only drawback is that the photo is split in two sections. It is either that or a not so good photo :-(
-
I am so happy that I have completed everything except the fillings. This project is much bigger than Options in Hardanger that I have done just before this one. Since the last photo posted, I have done all the motifs and also the little diamonds inside the bigger ones in preparation for the fillings.
-
I have also ordered the bell pull hardware yesterday. I will add a photo when I receive it.
-
I think that I will now concentrate on some other projects for a few days as I feel that I need a break from this right now.
-
Have also been slowly reading during the evenings Crewel World ... where murder in a small town keeps one smart lady on pins and needles, a book written by Monica Ferris (63 pages read out of 243, not too bad). I love to have something to read and it is the first time that I read a book where the story involves our stitching world, which makes it really enjoyable :-)
-
Pierrette =^..^=

Friday, April 25, 2008

More Options .... in Hardanger: Eyelets all done

Upper and bottom sections showing the eyelets. Had to scan in order to get a decent photo and unfortunately the piece is too big to go inside it without having to cut it in two, but at least now you can see it a bit better.


It was funny, my husband came into my stitching room when I was almost done with all the eyelets and he had the nerve to ask me if I was going to do the same in the surrounding border. I gave him "the look" and he understood (ROFL).
-
Next phase of this project will be to add the motifs and after that the real fun will start with the fillings.
-
Pierrette =^..^=

Tuesday, April 22, 2008

Elizabethan Pencil Box: Crewel


About a month or so ago, I saw this lovely pencil box from Tristan Brooks and I remember thinking at the time that it would be fun to have it so I could put my pens/pencils into and moreover I just love crewel designs and it was something that I had been wanting to stitch so I plurged and purchased it.
-
My goal is to rotate lots of projects using different techniques and each morning as I wake up decide which one I would select on that particular day.
-
As I was stitching a bit earlier today and I suddenly remembered that I had purchased a few Monica Ferris' mystery books a while back, but for some reason had not yet started reading them. I went to check which ones I had and I found that I had "Crewel World" amongst them, which seems to me very appropriate just now, so you all know now which book I will be reading (big grin).
-
Happy stitching and happy reading everyone!
-
Pierrette =^..^=

Saturday, April 19, 2008

More Options .... in Hardanger: Border stitched


After working really hard and long, I have just done the border with blanket stitches.
-
Again, I can't seem to be able to get a good photo showing the colors properly. The thread looks really good with the fabric, but whenever I look at any photos that I have taken so far, the colors just do not come up right. Too bad that you can't see the colors up-close and personal :-)
-
I am not sure if I am going to do the eyelets next or the motifs. The eyelets will be quite repetitive and there are quite a bit of them. They do need to be done before I can start having fun with the fillings though, so no way that I can get out of it :-(
-
I guess I may end up doing a bit of both, just to change the monotony a bit.
-
I also need to start looking online for some bell pull hardware. Not sure what I want, metal or wood. Choices, choices ..............
-
Pierrette =^..^=

Wednesday, April 16, 2008

More Options .... in Hardanger:Inside border


Have done a little more on my hardanger project. What you see is the inside border all around the kloster diamonds. I took my time and counted and recounted to make sure that there would not be any mistakes left once I finished that inside border as it is much easier to undo at this stage. It is just so easy to make mistakes when you work on a project like this. Either you miscount or you simply enter the wrong hole. That happens sometimes when the thread of the fabric is especially thin. At this point, I feel pretty confident that everything is as should be, so will now proceed with the outside border done in blanket stitch.

-

I must say that I always enjoy myself a lot when doing hardanger and Dale Sokolow's designs are all quite special. This is my second one of hers and a third one will soon be on its way to me :-)

-

Before that, I had taken Marion Scoular's beginner's hardanger course and I am so glad I took that one as it gave me a good basic knowledge of how to do hardanger making it so much easier to do the more advanced projects.

-

Pierrette =^..^=

Tuesday, April 15, 2008

More Options .... in Hardanger: Kloster Diamonds


A little progress to report here on More Options .......... in Hardanger as I have just finished stitching the kloster diamonds.
-
Gay Ann Rogers was saying the other day in her classroom that the thread color(s) look differently depending on which other colors surround them and I was able to verify that quite by chance actually with this project when I used the same exact thread on both pieces of hardanger (see the picture of the little hardanger piece to the right of this post). The main difference in my case is the slight change of color in my fabric. On the little piece to the right I have used an ASH ROSE fabric and in this project I am using a PLUM BLOSSOM fabric and the color of my thread just does not look the same.
-
We are learning quite a bit about colors and threads with Gay Ann and it is all free so anyone who is interested in learning can join in using the link above :-) We are even getting information about how to best photograph our work, which has always been a bit of a challenge for me.
-
Next phase of my project here will be to work the border with a blanket stitch. I am not following the progression order here as I thought that it would be nice to get this all out of the way before actually doing the fillings inside those diamonds.
-
Pierrette =^..^=

Monday, April 14, 2008

Windows into My Heart


This is a lovely design by Ruthmarie Hofmann that was offered by ANG as a Cyberworkshop a few years ago.
-
When I first saw this design I thought it was just so sophisticated that I just had to have it.
-
A few things happened though with this project that was out of the control of the teacher, but which nevertheless had a negative impact for me and thus I ended never finishing it. The first one was that Ruthmarie had to change the thread colors and the canvas, followed by a change of fabric to cover the box going from an ivory color which I loved to a dark pink/fuchsia color which I was not all that found of and to top it all after stitching what you see above in the photo I discovered that the space I had left over where you see the pink canvas not stitched yet, a little to the right of the middle center of the heart, was not large enough to be able to stitch the design (rounded shapes like the ones that will go in the left section) because the canvas that came with the kit was not the same size as the one that was used and I had not realized that. In all fairness there was a mention of that possibility in the notes, but I discarded it as I was sure that since I had the kit this did not apply to me. Wrong! Anyway to make a long story short, I just put the whole project aside. Now, years later I have decided that I will finish it using those same threads and will find something else to fill in that space and I will find a different fabric, something lighter, a bit like the original photo - will figure this out when it is all completed. Funny sometimes the things that can stop you cold in your tracks with projects.
-


This is a photo of what I loved and wanted to do. The fabric is a moire. It is a gorgeous box, no doubt about it and will see what I can do to make mine look as close to this one as possible, just because I love THIS design.

==========================================================

********* On another note, I was checking a new blog earlier called Stitching in Atlanta and saw the same needlecase that is shown on top of my home page blog, but stitched with ribbons mainly. Quite interesting, I thought.
-
Pierrette =^..^=

Sunday, April 13, 2008

More Options .... in Hardanger


More Options .... in Hardanger, a design by Dale Sokolow, another EGA GCC taken with EGA CyberStitchers.

-

Yesterday, I started working on this hardanger project and this is what I have been able to do so far. I am using a Plum Blossom Jobeland #28 fabric with some Watercolours threads by Caron. This project will be finished as a bell pull when completed.

-

Some links where you can see other EGA's Cyberstitchers who have already completed it. You can see a picture of the project here when you download the PDF or you can go directly on EGA National website

-

There is also a photo on Glenda's blog and another one one Feather Stitching's blog There are probably others on other blogs and I will be happy to add the links here if someone tells me about them :-)

-

I have at many occasions tried to work on multiple projects alternating between them but have never been so good at it, but here I am trying again. Will see if this works out for me or if it is completely against my nature.

-

My intention this year is to make a dent in my Group correspondence courses from EGA, ANG and EAC, so I will always be working on one while working on other projects so hopefully I can get them all done, probably not this year as it would be way too ambitious but in the years to come.

-

I just had a look at my Group Correspondence Classes and the different techniques used and here is a brief list: Stumpwork, Crewel, Beading, Needlepoint, Silk & Metal, Blackwork, Drawn thread, Fillet Work & Pulled Stitches, Casalguidi, Unkrainian Openwork, Florentine, Pulled & Drawn thread and probably others that I have missed. I think that I will have to revise my time frame to finish all those by a couple more years, that is if I stop adding to my pile. Well, better go back to my stitching as I am starting to feel a real sense of urgency :-)

-

Pierrette =^..^=

Thursday, April 10, 2008

Terra Rosa: Double Necked Wedding Jar & Shallow Bowl


The last few days, I have been working on Terra Rosa, designed by Elsa M. Parrish, and have completed the double necked wedding jar and stitched the shallow bowl next to it. There are six pottery items in this design: 3 vases, 1 bowl and 2 plates, plus lots of ribbons and borders all around, almost forgot about the buttes that are over the pottery. It is a fun design and the stitches used are very interesting and are extremely effective in reproducing the appearance of those Native American potteries, which I have always been very found of. I have managed to procure myself a few while traveling in the United States.
-
Stitches used for the double necked wedding jar are: double hungarian stitch, continental stitch, padded gobelin and bargello patterns.
-
Stitches used for the shallow bowl are: padded satin with tapered ends, continental tent stitch, milanese stitch, triangular filling and gobelin filling.
-
As you have probably figured out by now, this is a line drawing design and I have to be flexible with the instructions provided, what I like to call making executive decisions along the way :-)
-
If you like those two pottery designs, you have something to look forward to as the four remaining pieces of pottery are just as beautiful and are also different in shapes, motifs and colors and at the same time they all go very well together. They are olla (water jar), storage jar, flat plate and bridal basket. I will now start working on the olla (water jar).
-
So, plenty of work to do before this project is all done. I will post additional photos as soon as I have something to show you :-)
-
Pierrette =^..^=

Monday, April 07, 2008

Shades of Autumn: Brazilian Embroidery


A couple days ago, I got back from my framer the brazilian embroidery project called "Shades of Autumn" designed by Delma Moore.
-
I really love what she has done with it. The mat and the frame brings out the embroidery very nicely and I am very pleased with the result.
-
Today Gracie was brought to the same framer (when you have a good one, you don't want to change as she does excellent work) and she should be ready in approximately 3 weeks give or take a few days.
-
Normally I have her put a glass over everything that she frames for me, but with Gracie we decided against it. I can't wait to see how the framing will turn out but I need to be patient :-)
-
Been working diligently on my needlepoint project called "Terra Rosa" designed by Elsa M. Parrish and it is coming along nicely. I will post photos a bit later when I have a little more done to it.
-
Pierrette =^..^=

Saturday, April 05, 2008

Gracie: Free to swim around


Feeling like doing a Happy Dance as I have just finished stitching my first stumpwork project with Gracie. This was a Ganet Burr design written for us at EGA.
-
All these EGA GCC can either be taken directly from EGA National or like in my case from EGA CyberStitchers.


Have added a close-up of Gracie herself. I will now have to keep an eye on her if I don't want her to stray away too far. Have not done all this work to loose her now :-(
-
Pierrette =^..^=

Friday, April 04, 2008

Gracie: Body attached


An updated photo showing Gracie's body attached. There are two layers of padding under (with felt). I tried to take a photo in such a way that we could see the padded body. Not an easy thing to do as I tried different ways and this photo seems to be the best so far.
-
Pierrette =^..^=

Gracie: Fins and body


Have managed to take a photo of the last three sections that I had to stitch for Gracie before assembling her. I had been wondering how it would come out (photo that is) because today it is very dark as we are having again thunderstorms. I am not complaining, mind you, as we had a pretty awful drought last year so all the rain that we are getting is good :-)
-
On this photo you are seeing the two fins, one big and one tiny one and the body of Gracie that needed to be stitched separately because I will be adding two layers of padding under before attaching her to the main fabric.
-
I need to get my felt and cut two little pieces, one larger than the other, the larger one being on top of the smaller one, then I will make a long bullion to create her mouth and a few beads for her eyes as I want her to be able to see where she is going and perhaps also see her own reflection as she is quite pretty and gracious, which perhaps is where her name is coming from (big smile).
-
After that part is complete, I will be attaching the two fins to her body, then will be adding the two leaves, one on each side of her and will finish it up with some bubbles, which will be graciously coming out of her lovely mouth :-)
-
So, a lot of finishing work to be done today before I can let her loose in the water.
-
Pierrette =^..^=