Friday, May 30, 2008

Tara on one of my wall


Just for the fun of it, I thought of taking another photo of Tara now that I have found the wall where I wanted to display her. It is actually in the upstairs hallway. The lighting is a bit different so we are now seeing her a bit differently too colorwise.
-
I wanted to let the self-adhesive cloth hanger dry completely before attempting to put her on a wall as I did not want to see her crashing down and damage her lovely dress or even worst, hurt herself :-(
-
Pierrette =^..^=

Thursday, May 29, 2008

Tara with a fabric frame


I needed a break from Shalimar so I decided to finish Tara with a round fabric frame that I made following the instructions I had read in the Embroidery Canada, Spring 2007 magazine from an article called "It's time to display" written by Susan Donn.
-
This was really not very difficult to do and looks pretty good. You need to mount both fabrics on foam core or in my case I used some mat similar to what the framers use and cut each piece the size that I needed. Then, I added some padding to each one (next time around I will add more padding under the stitched piece so that I can add a thicker cord around it) and added my stitched Tara on the smaller circle and my chosen fabric on the larger one, and laced both individually. After that I added a brown craft paper on the back of the bigger circle. I glued Tara on the bigger circle and made some cording and added to both. All that remains for me to do now is to glue a picture hanger (cloth with self adhesive), let it dry and then hang on my wall.
-
It is really a nice way to finish a project and it is much less expensive than having it framed at the framer, mostly for a little project like this one. This can be done for any shape project whether it is rectangular, triangular, square, etc.
-
I could also have chosen some fabric with prints on it, but I wanted to keep it simple and elegant. It really depends on the effect that we want to achieve.
-
I was hoping to receive my threads and canvas for Mystery in a Corner by Gay Ann Rodgers, but the postman came and they were not there :-(
-
Pierrette =^..^=

Wednesday, May 28, 2008

Shalimar: Second corner completed


Slowly moving along with this project. So far, the 4 middle sections and 2 corners done, remains 2 more corners and the lovely middle section, which I keep for last to motivate me to keep going whenever I ran out of steam :-)
-
Pat is now working on Gail Hendrix' blue jay on her blog and perhaps after that she will start working on the cardinal, which is the one I have. -
-
Yesterday, I was having a slow day, feeling a bit tired, and went to sit comfortably on my lazy chair with a book called French Knot Pictures by Christine Harris. I have always loved doing French Knots and Christine has some lovely miniature scenes in her book. Most of them are about 2" by 3" in size or 5 cm by 7 cm and I was thinking of stitching one, working on that particular project only during the evenings. She says it takes approximately 15 hours to complete a project of that size, so not that bad compared to some of the big projects I am currently working on.
-
There was some discussion about some fun painted canvas made by Maggie & Company on the Needlepoint group. I was tempted by some of them myself but not sure that I want to tackle another big project right this minute.
-
Going back for more stitching now :-)
-
Pierrette =^..^=

Saturday, May 24, 2008

Old Country: What a wonderful exciting stitching trip I just had :-)


I am doing a Happy Dance as I am typing this as I have just finished stitching Old Country and what a wonderful stitching adventure it was with all those fun stitches that I rarely ever have the opportunity to use.
-
I made a few close-ups for some of the fun stitches that Jim included in this project. This one here is called a Walneto motif. Isn't it just beautiful. If you have Jean Hilton's book called "Stimulating Stitches", you will find some good explanations with little charts, which may help you along if you are having problems grasping how it is done.


This one below includes some large crescent motifs and inside you find big and small Jessicas, which we all know by now that Jim is very found of them and no wonder as they do make a statement. At first I was not all that crazy about them, but since I had to do some in all 10 ornaments completed so far, Jessicas and I have become quite good friends now :-)


I now need to clean up a bit after myself as there are threads all over the place and decide what I will tackle next. Will it be Windows into my Heart or More Options in Hardanger or Terra Rosa or Shalimar or doing the finishing for Tara or the brazilian rose or .................... (big grin)
-
You will all find out on my next post, including myself (ROFL).
-
Pierrette =^..^=


Friday, May 23, 2008

Old Country: Slow progress


I have managed to do a little more on Old Country while doing a million other things. Well maybe not, a million thing, but you get the idea (big grin). I am still having fun with it as it is such an interesting design with so many fun stitches that I normally don't use.

-

The other day I came across a very interesting website called Vetty Creations . I guess that by now everybody knows that I like to do a little bit of this and a little bit of that, so I was very happy when I came across that site.
-
While spending time on Yvette Stanton's site I discovered many wonderful projects as well as books about Ukrainian drawn thread embroidery, Mountmellick embroidery and Hardanger. After reading a bit about her books, I decided to go hunting for them here in the USA and found them at Stitching Bits and Bobs. There are only two out of the three books listed on their website but they did have the Hardanger one also. I was happily surprised by their fast service.
-
What attracted me to these books is the fact that there are lots and lots of photos showing step-by-step instructions to help me along as I try those new techniques. I have done some hardanger embroidery, but have not yet done anything using the other two techniques, so these books will become very handy.
-
Yvette also has a blog called White Threads and a few Yahoo groups to help those interested to learn more.
-
Going back to my stitching now as I still have a bit more to do before I can call this one finished :-)
-
Pierrette =^..^=

Monday, May 19, 2008

Old Country: Center


A little more done on Old Country. On this ornament we are starting from the center moving outwards.
-
When I saw this ornament in my mail box a few days ago, I knew that I would have a ball with this one. The design and colors are exactly what I like. I remember having about the same feelings when I received Mojave.
-
Going back to my stitching to do a little bit more and see how much I can accomplish today :-)
-
Pierrette =^..^=

Sunday, May 18, 2008

Old Country: Dodecagon Ornament Series designed by Jim Wurth


I am doing something that I rarely do, photograph a stitch. I love this one so much together with the yummy thread colors used that I stopped everything so that I could take a photo before moving on. This stitch is called "Mistake Stitch". This stich goes over theVan Dyke stitches (the ones that are orange in color).
-
A while back I purchased three books written by Jean Hilton and each time that Jim Wurth uses a special stitch in his Dodecagon Ornament Series I pick up one of Jean's book and read everything I can find out about that particular stitch. The Mistake Stitch can be found in Jean's book called Jean Hilton's Needlepoint Stitches, on pages 10-11. In her book, Jean explains how this stitch came about. Jean says that in 1974, one of her students was trying to do a waffle and rather than branch out, she went up. Jean loved the stitch and called it the "mistake stitch" as the name of the student in question was also Jean. When I read that, I thought this was so interesting to see how a beautiful stitch came about.
-
You may also want to check Jeanne's blog as she is also working on Old Country and has more done on hers than I have on mine.
-
Pierrette =^..^=

Saturday, May 17, 2008

Windows into My Heart: A little more done after a 4-year hiatus


A little progress has been made on Windows into my Heart, a design by Ruthmarie Hofmann. The first thing I had to do, as you can easily imagine after a 4-year hiatus, was to reread the entire project instructions and also all the notes that Ruthmarie gave us during that cyberclass and she was quite generous about them too. So, somewhere between reading most of it, but not quite all of them, my little fingers started itching for stitching, so stopped reading and started working on the right side of the heart. The last little section is filled with basketweave stitches. I do love stitching basketweave so much more than tent stitch. I had to refresh my memory about it as I do not work that stitch all that often. One thing that I always need to remember is that when I am going UP, I need to cover the HORIZONTAL mesh of canvas and when I am going DOWN, I am covering the VERTICAL mesh. The rest is a piece of cake, as they say.
-
Next to that basketweave section, I did a vertical row of French Knots, which is another stitch that I love to do. I have a book called French Knot Pictures by Christine Harris and each time I look at it, I say to myself, I need to make one of these projects made entirely in French Knots. At first I was thinking of making those French knots using my red thread, but after I finished stitching the basketweave, I decided against it. I thought that the overdyed thread would do a better job. I used 4 strands of the overdyed and only one wrap. That makes a much better looking knot then when making two wraps. To make things more interesting, I also put together the threads in opposite direction in my needle, two on one side and the two other on the other side, which mixed the colors even more in my needle. My thinking for doing that was that it really does not take much thread to make one wrap and I was concerned that I would not get enough color change in my row. I like the end result.
-
What now remains to do on this piece is the large section on the left which will be covered with free-form eyelets using the same overdyed thread that I have used for the other square eyelets and French knots. I will be adding lots of beads and French knots in that section.
-
After that is completed, the only other section left to stitch will be the narrower vertical section close to the middle of the heart. There I will need to make some serious decisions. I will still be using the same overdyed thread, but not sure what stitch I will use. I will leave that decision until I get there. By then it will be much easier to see what will look nice and what will be a no-no.
-
There is a little bit of news about all of you who loves Tanja Berlin of the Berlin Embroidery website in Canada. Tanja has decided to start a Gallery to showcase her customer's completed designs of hers. She contacted me not long ago to ask if I wanted to participate. She knew about my completed work because I had taken advantage of her Free on-going critique. I sent her photos of the two projects that I had completed and they are now there with many from other stitchers around the world. I thought that was such a neat idea in more ways than one. Anne Stradal does the same thing on her website where she has a special Guest Gallery. No doubt that there are others out there. I just don't know about them.
-
Better go back to my stitching as my list of projects to do is not getting smaller, but bigger all the time.
-
Pierrette =^..^=

Tuesday, May 13, 2008

Shalimar: One corner completed


Wow, there was really lots of work to do in that corner, more than in the middle pannels. The other three corners are similar and also different, similar because they all have those four hearts in the middle of each losange, but the stitches involved in making them are a bit different and also the stitches surrounding the four sides of that losange are all a bit different. The 4-way continental, which I am not that crazy about, is the same though in each corner.
-
As I said in a previous post, I will scan each section when Shalimar is all completed so that we can see the stitches used in that entire design more clearly. With the camera, it is just not as clear as a good scan, but for that I will have to remove the canvas from the stretcher bars and I really don't want to do that each time I finish a section, so will do it at the very end and explain a bit more at that time.
-
I have been thinking about a discussion on blogging while stitching and I hope that everyone who feels that this is something that they would like to do won't be deterred by some of these messages.
-
I remember that I did things very progressively. First, I used to post photos in Yahoo photo albums of different groups that I belonged to, then I progressed to a Webshot photo album, which I still have and always keep up to date, then one day I was talking with my good friend Terry and we both decided that we were going to start blogging about our stitching and that was a couple years ago and we never looked back.
-
Like most people I did not have a clue how a blog worked and I am still learning stuff as I go along and that is OK with me. It would have made my life easier if I had known some of the things from the get go as whenever I learn new things I feel the need to go back through my whole blog and change things, which takes quite a bit of time, but that's me.
-
I remember looking at blogs at the time and writing down what I liked and disliked about the stitching blogs that I was looking at and then made a few decisions for myself. One of those decisions was to keep my blog entirely about stitching, a decision that I have stuck to till this day. Another decision I took at the time was to make sure I would have at least one photo each time I made an entry on my blog, as I am very visual and hate to read lots of entries with no photos included, but then again that is just me. I created my blog according to who I am and my likes and dislikes.
-
I have tried to post as much as I could since the very beginning, but do not want to put pressure on myself to do so if I can't. Blogging for me is for pleasure and it also encourages me to keep up with my stitching.
-
I also try to give links of where any of the projects I have stitched during those years can be located or if I can't do that, at least give the name of the designer and whatever information I have at the time so that anyone interested in stitching the same project have some basic information helping them to find it. It avoids the frustration of seeing some lovely project that I would like to stitch on a blog and having no clue as to how to find it without having to contact the blogger, which is no big deal in itself, but it makes life easier if the information is just there.
-
My message to anyone who is reading this post and feel like this is something that you would like to try, go ahead, give it a shot and have fun with it. If you are like me, you will learn as you go and we bloggers who have a little bit of experience are always here to give you a helping hand.
--
Pierrette =^..^=

Monday, May 12, 2008

Shalimar: 4 panels completed and one corner started


I have done a little progress since my last post. Completed the middle pannel on the left side and started one corner. I need to finish the 3 other sides of the losange and still have a few stitches to complete inside the losange like a few running stitches between the hearts and some French knots around each heart.
-
This is taking much longer than I thought it would, but I always miscalculate the time needed for any project, so I may have to double the time that I thought it would take me and perhaps I will be surprised by finishing a little earlier than my anticipated deadline.
-
Ever since I restarted working on Shalimar, I have been thinking of Hapsburg Lace Sampler which I completed some time back. Some similarities between the two projects, like the color and size of the canvas, threads used DMC Perle and the lacing effect of both.
-
Been reading that some have framed Shalimar instead of making a pillow, so thinking about it and not completely sure what I will do with it once all stitched. Still plenty of time to think about it at the dizzying speed I am going :-(
-
I finally have the supplies I need to finish Tara as I have just received the little Stanley cloth self adhesive picture hangers all the way from Canada thanks to my good friend Nicole who lives in Quebec. She went hunting for them for me. I will be finishing Tara the same way as Susan Donn explained in her Embroidery Canada Spring 2007 article. I thought it was such a neat idea, so will be trying it. Will post photos as soon as done and will explain a little bit more then.
-
Slowly plugging along in my reading of Framed in Lace whenever I have time, but have not had all that much free time lately.
-
Not done anything more on my brazilian embroidery rose, nor Terra Rosa, nor More Options for Hardanger and have only been looking at Windows into my Heart as been concentrating on Shalimar these past days.
-
I am glad that I have decided to take the bull by the horns and finished my Elizabethan pencil box as Barbara Jackson from Tristan Brooks Designs never answered my email for help. At this point I can only speculate as to the reason(s) why ......
-
My friend Elisabeth from England has shown me how to do proper links in my posts yesterday and have since started going back through all my posts to change all of them, so a big thank you Elisabeth :-) You may want to spend some time on her blog, which is marvelous.
-
Better go now and keep plugging along on Shalimar.
-
Pierrette =^..^=

Thursday, May 08, 2008

Shalimar: 3 out of 9 panels completed


Since yesterday morning, I have managed to stitch a third square/panel. If only I could keep this tempo, I would be all done in, let's see now,, got 9 panels, if I take 1½ day per panel, that would make 6 times 1½ = 9 days. Hey, that would not be too bad, but knowing me, something will happen and I won't make it, so let's say I give myself 2 weeks and my oldest UFO would have been completed. Hard to believe right now :-(
-
When it is all done, I will scan the new finished panels/squares so that each design can be seen better. That is what I have done for the previous photos, just before I put it back on my stretcher bars. Digital photos do not show stitches as well, sorry to say, at least when I am taking the photos.
-
Going back to my stitching now. Not a minute to spare if I want to make it (big grin).
-
Pierrette =^..^=

Tuesday, May 06, 2008

Shalimar


A good friend of mine when she saw this project called Shalimar, which end result will be a lovely pillow, strongly encouraged me to finish it.
-
The photo above shows one little section that has been stitched.


A second photo shows another section with a different design.


Here with the third photo we can see the two stitched sections with some unfinished ones.


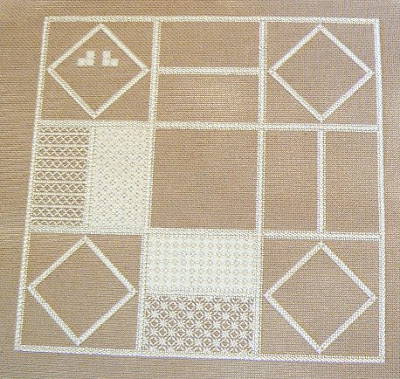
Here we have a view of the entire project. There are still quite a bit of stitching to do, but it is the kind of stitching that gives a lace effect and is quite lovely.
-
Shalimar is a Carol Costello design. Some of you may be familiar with her designs. You can find it in a book called Fancy Work & Fantasies. There are two different pillow designs in the book. The other one is quite lovely too, but I prefer this one. Shalimar has a beautiful vase with flowers in the center section, little hearts in the four squares and lots of beautiful stitches.
-
The threads used for this project are Medici and DMC Perle.
-
It has been such a long time since I have stitched on that project that I won't even try to guess when it was. Yes, it was that long ago. That makes it quite a UFO, doesn't it? I think that this is my oldest one, when I think of it, which means that I will probably have to have some kind of celebration when it is all completed :-)
-
I am having some bad Spring allergies these days and it is making stitching much more difficult, but not impossible.
-
Have started working on my brazilian embroidery rose the other day, so it is progressing slowly.
-
Still reading my Monica Ferris book called Framed in Lace. Hey, that is probably why I have just picked up Shalimar as it looks like Lace. I had not realized that until just now. I think that I may be pushing that thing a bit far by doing some crewel work when reading Crewel World and now wanting to work on Shalimar because I am reading Framed in Lace. The next one on the list is called Murderous Yarn, does that mean that I need to start knitting something? I have not knitted since I was 12 years old probably :-(
-
Oh, well, enough chatting and better get myself moving on my stitching.
-
Pierrette =^..^=

Sunday, May 04, 2008

Elizabethan pencil box

I have never been very patient at waiting for answers, so decided to take the bull by the horns and do the finishing right away.
-
First thing I did was to lace my finished project on a piece of cardboard that my husband precut for me. Once it was all laced properly, then I inserted it in the opening and it fit snuggly, not too tight and not too loose, just right.
-
The inside of the box except for the cover was all covered with a dark brown felt, so I went looking into my stuff and found one piece that was very very close to the same shade of brown that Olde Colonial had used, so I was really happy as it avoided me a trip to the store.
-
My husband who is very good at making technical drawings made some calculations so that the felt fabric would go down inside the cover and then up the side and then cover the top of the inside box where the cover meets the bottom part. He then made a drawing with all the proper dimensions on a white piece of paper.
-
The next part was to use that drawing for my cutting pattern and cut the felt. After cutting, we tried it to make sure the dimensions were right and then glued the whole thing with a glue gun. It almost looks like a professional job and it did not cost me anything :-)
-
I will be using the box to put the pens/pencils that I use the most for my embroidery and won't have to keep looking for them each time I need them.
-
Last evening I decided that I was going to start a Brazilian embroidery project, a lovely rose. It is not a terribly big project so I should be able to post a photo in a few days time, at least I hope so.
-
Pierrette =^..^=

Saturday, May 03, 2008

Elizabethan pencil box all stitched


I forgot to include a photo showing the whole design in my previous post so here it is :-)
-
A few comments about this kit. The instructions were very good and had good diagrams explaining the stitches. Another thing that for me is very important is that the threads included in the kit were plentiful and at no point was I concerned that I would run short if I made an error and had to start over.
-
Below is a photo of the box in which the finished stitched design will go into. It came as you see without anything more. Have written to Barbara Jackson from Tristan Brooks Designs, the designer and seller of this Olde Colonial Designs box to make sure nothing had been forgotten like finishing instructions, little cardboard or something, but have not heard back from her yet. She may be out of town teaching or something so will put the finishing on hold for now and see what happens.

Now, moving on to some other projects. Need to think which one as I have quite a few already started and lots and lots not started yet but begging to be, so will see :-)
-
Pierrette =^..^=

Elizabethan pencil box: third and last section


Completed the stitching of the third and last section of my Elizabethan pencil box design.
Pierrette =^..^=

Friday, May 02, 2008

Elizabethan pencil box: middle section


I have done a little more on this crewel project by adding some strawberries and a little bee to what I had already stitched.
-
Talking about crewel, yesterday I finished reading Monica Ferris' book entitled Crewel World and I have enjoyed it so much that I have already started reading another one of her book called Framed in Lace.
-
Pierrette =^..^=